1. Get started

  2.  Welcome
  3.  Get started
  4.  Run as a Windows service
  5.  Build your first app
  6.  Requirements
  7.  Accessibility support
  8.  Development overview
  9.  About release versions
  10.  What's new
  11.  Frequently asked questions
  12. Working with apps

  13.  Home page
  14.  Create or import an app
  15.  Edit and launch an app
  16.  Choose a theme
  17.  Select a map or scene
  18.  Add widgets
  19.  Widgets overview
  20.  Configure app attributes
  21.  Preview apps on smaller screens
  22.  Export as a template
  23.  Edit or preview template
  24.  Use URL parameters
  25.  Upgrade apps
  26. Configure 2D widgets

  27.  About widget
  28.  Add Data widget
  29.  Analysis widget
  30.  Attribute Table widget
  31.  Batch Attribute Editor widget
  32.  Basemap Gallery widget
  33.  Bookmark widget
  34.  Business Analyst widget
  35.  Chart widget
  36.  Controller widget
  37.  Coordinate widget
  38.  Coordinate Conversion widget
  39.  Cost Analysis widget
  40.  Data Aggregation widget
  41.  Directions widget
  42.  Distance and Direction widget
  43.  District Lookup widget
  44.  Draw widget
  45.  Edit widget
  46.  Emergency Response Guide widget
  47.  Extent Navigate widget
  48.  Filter widget
  49.  Full Screen widget
  50.  Geocoder widget
  51.  GeoLookup widget
  52.  Geoprocessing widget
  53.  Grid Overlay widget
  54.  Gridded Reference Graphic widget
  55.  Group Filter widget
  56.  Image Measurement widget
  57.  Home Button widget
  58.  Incident Analysis widget
  59.  Infographic widget
  60.  Info Summary widget
  61.  Layer List widget
  62.  Legend widget
  63.  Measurement widget
  64.  My Location widget
  65.  Near Me widget
  66.  Network Trace widget
  67.  Oblique Viewer widget
  68.  Overview Map widget
  69.  Parcel Drafter widget
  70.  Print widget
  71.  Public Notification widget
  72.  Query widget
  73.  Related Table Charts widget
  74.  Report Feature widget
  75.  Reviewer Dashboard widget
  76.  Scalebar widget
  77.  Screening widget
  78.  Search widget
  79.  Select widget
  80.  Share widget
  81.  Situation Awareness widget
  82.  Smart Editor widget
  83.  Splash widget
  84.  Stream widget
  85.  Suitability Modeler widget
  86.  Summary widget
  87.  Swipe widget
  88.  Threat Analysis widget
  89.  Time Slider widget
  90.  Visibility widget
  91.  Zoom Slider widget
  92. Configure 3D widgets

  93.  3DFx widget
  94.  About widget
  95.  Basemap Gallery widget
  96.  Compass widget
  97.  Coordinate widget
  98.  Daylight widget
  99.  Full Screen widget
  100.  Home Button widget
  101.  Layer List widget
  102.  Legend widget
  103.  Measurement widget
  104.  My Location widget
  105.  Navigate widget
  106.  Search widget
  107.  Share widget
  108.  Slides widget
  109.  Splash widget
  110.  Zoom Slider widget
  111. Widget development

  112.  Get started
  113.  Naming conventions
  114.  In-panel and off-panel widgets
  115.  Deploy your widget
  116.  Required files
  117.  Widget manifest
  118.  Extend BaseWidget
  119.  Required properties
  120.  Define the template
  121.  Configure the Demo widget
  122.  Add i18n support
  123.  Make widgets user-friendly
  124.  Build your first app
  125.  Communication to app container
  126.  Widget properties
  127.  Make widgets responsive
  128.  Communication between widgets
  129.  Dojo dijit
  130.  Make widgets configurable in builder
  131.  Make widgets backward compatible
  132.  Create a controller widget
  133.  Widget life cycle
  134.  Add help for your widget
  135.  Create a feature action in your widget
  136.  Provide and consume data sources in widgets
  137.  Best practices for unit testing
  138. Theme development

  139.  Theme elements
  140.  Create a theme
  141. 3D development

  142.  3D development guide
  143. Sample code

  144.  Create a custom in-panel widget
  145.  Create a ListView widget
  146.  Create a custom widget using the Report dijit
  147.  Create a new theme
  148.  Create a new style for a theme
  149.  Create a new default layout
  150.  Create a nondefault layout
  151.  Create a new panel
  152.  Create a new layout widget
  153.  Create a controller widget
  154.  Create a feature action in your widget
  155.  Send a layer to the Attribute Table widget
  156.  Open multiple widgets simultaneously
  157.  Use other libraries
  158.  Change the URL of ArcGIS API for JavaScript
  159. Deployment

  160.  Deploy your app
  161.  Use proxy
  162.  Web-tier authentication
  163.  Custom widget and theme deployment
  164.  Upgrade custom widgets and themes
  165. Framework reference

  166.  CSS framework
  167.  FeatureActionManager class
  168.  FilterManager class
  169.  LayerInfo class
  170.  LayerInfos class
  171.  LayerNode class
  172.  LayerStructure class
  173.  PanelManager class
  174.  SelectionManager class
  175.  Utils class
  176.  WidgetManager class
  177. dijit

  178.  FeaturelayerChooserFromMap class
  179.  FeaturelayerServiceBrowser class
  180.  FeatureSetChooserForSingleLayer class
  181.  Filter class
  182.  ImageChooser class
  183.  ItemSelector class
  184.  LayerChooserFromMap class
  185.  RendererChooser class
  186.  Report class
  187.  SnapShot class
  188.  SymbolChooser class
  189. JSON reference

  190.  App configuration
  191.  Map configuration
  192.  Widget configuration
  193.  Widget pool configuration
  194.  Widget on-screen configuration
  195.  Panel configuration
  196.  Group configuration
  197.  DataSource configuration
  198.  About
  199.  Analysis
  200.  Attribute Table
  201.  Basemap Gallery
  202.  Bookmark
  203.  Chart
  204.  Coordinate
  205.  Directions
  206.  Draw
  207.  Edit
  208.  Full Screen
  209.  Geocoder
  210.  Geoprocessing
  211.  Controller
  212.  Home Button
  213.  Image Measurement
  214.  Infographic
  215.  Layer List
  216.  Legend
  217.  Loading Page
  218.  Measurement
  219.  My Location
  220.  Near Me
  221.  Oblique Viewer
  222.  Overview Map
  223.  Print
  224.  Query
  225.  Report Feature
  226.  Reviewer Dashboard
  227.  Scalebar
  228.  Search
  229.  Share
  230.  Splash
  231.  Stream
  232.  Swipe
  233.  Time Slider
  234.  Zoom Slider
  235. What's new archive

  236.  What's new in version 2.23
  237.  What's new in version 2.22
  238.  What's new in version 2.21
  239.  What's new in version 2.20
  240.  What's new in version 2.19
  241.  What's new in version 2.18
  242.  What's new in version 2.17
  243.  What's new in version 2.16
  244.  What's new in version 2.15
  245.  What's new in version 2.14
  246.  What's new in version 2.13
  247.  What's new in version 2.12
  248.  What's new in version 2.11
  249.  What's new in version 2.10
  250.  What's new in version 2.9
  251.  What's new in version 2.8
  252.  What's new in version 2.7
  253.  What's new in version 2.6
  254.  What's new in version 2.5
  255.  What's new in version 2.4
  256.  What's new in version 2.3
  257.  What's new in version 2.2
  258.  What's new in version 2.1
  259.  What's new in version 2.0
  260.  What's new in version 1.3
  261.  What's new in version 1.2
  262.  What's new in version 1.1

Directions widget

The Directions widget provides a quick and efficient method of calculating turn-based directions between two or more locations. This widget uses both a network route service and a geocoder service.

LicenseLicense:

If you include this widget in your app, confirm that your end users have the required privileges described in the Use this widget section.

LicenseLicense:

The ArcGIS Online network analysis services and real-time traffic map services require an ArcGIS Online organizational subscription. If you choose to work with these, specify a valid username and password for ArcGIS Online. Each successful request to the service incurs credits taken from your subscription. In addition, if you have an ArcGIS Server network analysis service, you can also specify the URL.

TipTip:

If you want to share your secure service item with the public, for example, as part of a public web app, store the credentials with the item so the public is not required to log in to access your app. See ArcGIS Server web services for more information.

Configure the Directions widget

This widget can be set to open automatically when an app starts. Hover over the widget and click the Do not open this widget when the app starts button Do not open this widget when the app starts to change the setting to Open this widget automatically when the app starts. (For widgets that you need to add to the app first, you can turn on this option after configuring the widget.)

Steps:
  1. To open the configuration properties dialog box, choose between Search source setting or Route setting.

    By default, the following URLs are from your organization or the utility services of Portal for ArcGIS:

    • Search source setting—Geocoder
    • Route setting—Route, Travel modes, Traffic layer

    The travel modes and traffic layer URLs are optional. If the former is not specified, you will still see the default travel modes with the route URL when using the widget. If the latter is not specified, you will not see the traffic options when using the widget.

    TipTip:

    The example URLs that are unavailable in the Travel Modes URL and Traffic Layer URL text boxes can be used to enable default travel modes and traffic layers.

  2. Update Search source setting. Default values from the services populate the options.
    1. Add—You can add additional geocoder URLs or feature layers.
    2. Geocoder name—Provides the name of the geocoder service.

      You have the option to customize this field.

    3. The Placeholder text displays in the address lookup text box when no text has been entered.

      You have the option to customize this field.

    4. Search fields—Select an expected field to search with.
    5. Display field—Select an expected field to search with.
    6. Country or region code(s)—Allows you to define what region to search for.

      Leaving this value blank will search all countries and regions.

    7. Maximum suggestions controls the number of suggested locations returned from the geocoder service.
    8. Enable local search—Allows you to define a minimum map scale to search for. You can also define this search by adding a radius.
    9. Optionally, check the Only search in current map extent to define your search within the map extent.
    10. Check Auto complete to have the search text box fill in possible addresses automatically by querying the geocoder service.
    11. Use Search delay to control how long the UI pauses before updating the list of candidate locations after the last key is pressed.
    12. Minimum characters determines the minimum number of characters required to query for suggested locations.

    NoteNote:

    Search sources such as geocoders or feature layers can be rearranged or deleted in the left panel, however, there must be at least one geocoder existing to get routes for the Directions widget.

  3. Update Route setting. Default values from the services populate the options.
    1. Directions language is the culture code (for example, en_US for American English, de_DE for German). Output is customized for the specified locale if available.
    2. Directions length units are the units of measure used when computing direction distances.
    3. Impedance attribute is the network attribute used for impedance. For example, set it to Time for the quickest route or Length for the shortest drive if the service has these attributes available. With an empty array, it defaults to the default of the service.
    4. Preset stops—Preset the start and endpoints by typing the addresses or places in the text box.
    5. Barrier Layers—Set point, line, or polygon layers.
      NoteNote:

      There are limitations for routing services regarding maximum number of barriers. Adding custom barrier layers might exceed the maximum counts.

  4. Click OK to close the dialog box.

Use the Directions widget

CautionCaution:

Using the ArcGIS Online network analysis services consumes credits. Verify that you are signed in to your organization with privileges to perform network analysis.

Now you can open the Directions widget by clicking the Open route button in the pop-up, where a route is generated by the Plan Routes tool from the Analysis widget. Make sure the Include route layers box is checked when running the Plan Routes tool.

Steps:
  1. Click the directions icon to open the Directions widget.
  2. Enter the start and end destinations if they are not preset.
    • Type the addresses in the fields, which may autocomplete addresses, locations, or feature layer field names, depending on the configuration.
    • Add destinations by clicking the icon Add destinations by clicking the map to enable it, and clicking the map.
  3. Optionally click the Reverse directions button to reorder the origin and destination.
  4. Optionally, to add more destinations, click Add. Each destination can also be dragged onto the map. Note that the Reverse directions button does not appear when there are more than two destinations.
  5. Optionally click the barriers icon and start to draw lines or polygons on the map to create barriers.
  6. Select a travel mode from the drop-down list if applicable. The default mode is Driving Time.
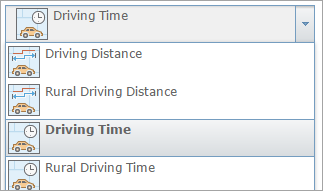
    Travel mode

  7. If the specified travel mode is time-based and supports live traffic data—for example, Driving Time—choose a departure option of Leave Now or Depart At. If you choose Depart At, select a departure time and date. The departure time is set in the time zone of the place of departure.
  8. Click Options to display more options. Check Return to start to create a round-trip route. If available, check Show traffic to factor real-time traffic conditions into the total time of your route. Switch between MI (miles) and KM (kilometers) to control the units used to report distances in the generated set of directions.
  9. Click Get Directions.

    The map updates to display the route, and the directions display in the Directions widget.

  10. Each turn in the directions list is interactive. Click a turn to pan to that location on the map. The route leading to that turn also highlights on the map.
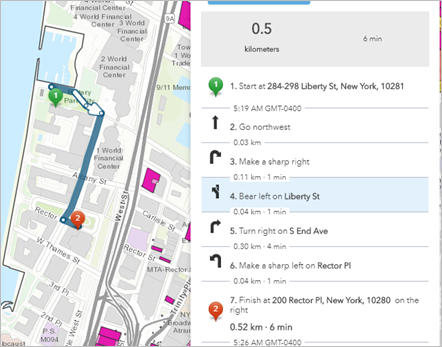
    Directions with highlighted turn

  11. Click the print button Print to open the directions in a new window for printing.
  12. To clear the current set of directions from the map, click Clear next to Get Directions.